How to generate scan reports
You can export your scan reports in three main ways: manually through the platform interface, through API or have them delivered to your email through notifications.
Manual Export Options
You have several flexible options for downloading reports manually:
1. Directly from the Scan Interface
- After running a scan, click the “Generate report” button visible within the scan results page.

2. From the Scan List View
- Navigate to the Scans section.
- Hover over the desired scan entry - an “Export scan” button will appear on the right. Click to download.

Or simply select the checkbox next to the scan you want to export - once selected, an ''Generate report'' button will appear at the top for easy download.
💡 Make sure all of your selected scans are on the same page. You can display up to 250 records and use the advanced search in order to sort and filter out your scans.
3. From the Findings Page
On the findings page, you can hand-pick the specific findings you’d like to include in your downloaded report. After making your selection, just click the “Generate” button to create your customized report.
Aggregated Scan Reports
-
In the Scans section, select multiple scans by ticking the checkboxes.
-
An “Generate report” button will appear at the top - Once clicked, it will generate an aggregated scan report for all the selected scans
-
This is ideal for generating report which combines multiple scan results across different tools or targets into one consolidated file.
-

Get scan reports sent right to your inbox
This option allows you to receive different scan reports directly via email, provided that specific notification criteria are met.
Follow these steps to set it up:
-
Go to your Notification Section
-
Configure them to automatically send scan reports to your preferred email address upon scan completion.
Report types are available in two formats: Raw data exports and Editable penetration test reports and can be grouped by Targets or Vulnerability.

-
Raw reports can be downloaded in standard formats such as PDF, HTML, JSON, CSV, and XLSX.
-
Editable reports are available in DOCX format, allowing you to easily customize and tailor them for client delivery or internal documentation.
The aggregated scan reports are available for download in the following formats:
1. Discovery + Discovery (Same/Different Tool) -> HTML + PDF2. Vulnerability + Vulnerability (Same/Different tool) -> All exporting formats
3. Discovery + Vulnerability -> HTML + PDF
4. Discovery (Single) || Vulnerability (Single) -> All exporting formats
Each scan report includes a variety of filter options, allowing you to customize the content displayed in the final report. Simply check or uncheck the relevant boxes to include or exclude specific data, ensuring the report reflects only the information you need.

- To exclude a certain finding/vulnerability from a scan result, you will need to go to /findings, select that finding and mark it as ignored.
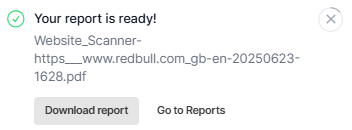
Once you've reviewed the scan results, ensured the filters are correctly applied, and selected the appropriate report type, simply click 'Generate Report'. Within seconds, your report will be ready for download - either via the pop-up on the right side of your screen or directly from the Reports section.

Prefer a visual walkthrough? Click here to watch a video that explains the entire exporting process outlined in this article.