The Pentest-Tools.com Hyper-V VPN Agent is a piece of software that can be deployed on various machines so our scanners can reach your internal network.
Step 1: Create a new VPN Profile
Go to your VPN Profiles page, click + Add, and then select VPN Agent.
There are important configuration options that can be set now or later by editing the VPN Profile:
- If your targets resolve only through a specific DNS, please specify it in the DNS Servers section, but be sure to also include Google’s DNS (8.8.8.8), as it’s required for the agent to function properly.
-
Don't forget to select the desired Workspace(s) that you want to associate this VPN Profile with. All scans in these Workspaces will pass through the VPN tunnel created.
- [Optional] Specify a limit for how many parallel scans you can execute over this VPN Profile (you can't set more than the maximum parallel scans limit included in your subscription). This is useful especially for setups that cannot handle more than a few parallel scans due to network limitations.
Step 2: Download the Hyper-V Agent
Hover over the newly created VPN Profile and click Deploy.
Click Download beneath Hyper-V under the Virtual Machine tab.
Extract the files.
Step 3: Launch the Hyper-V Agent
Make sure you have the Hyper-V Windows feature enabled in order to launch the Agent:
- Go to Control Panel > Programs > Programs and Features;
- Click Turn Windows features on or off. The Windows Features window is displayed;
- Select the entire Hyper-V folder and click OK. The system needs to restart to enable Hyper-V Manager.
- Use your Windows search box to look for the Hyper-V Manager and open it up;
- Select your device on the left side and then click New > Import Virtual Machine... on the right side;
- Go under the Locate Folder tab on the newly popped-up window and then select the Virtual Machines folder from the extracted files;
- Click Next three times and then Finish;
- The Agent will now be displayed in the Hyper-V Manager, so open it and click Start;
- The Agent will attempt to connect automatically.
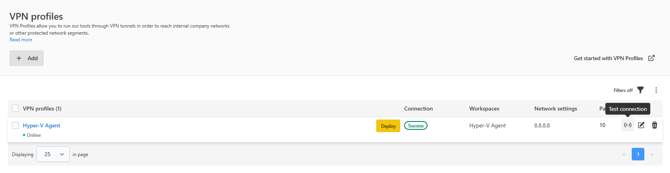
Step 4: Test the connection
Return to the VPN Profiles page and check to see if the status of the VPN profile is now "Online".
You can also press the Test connection button for the profile - the status in the Connection column should change to "SUCCESS".